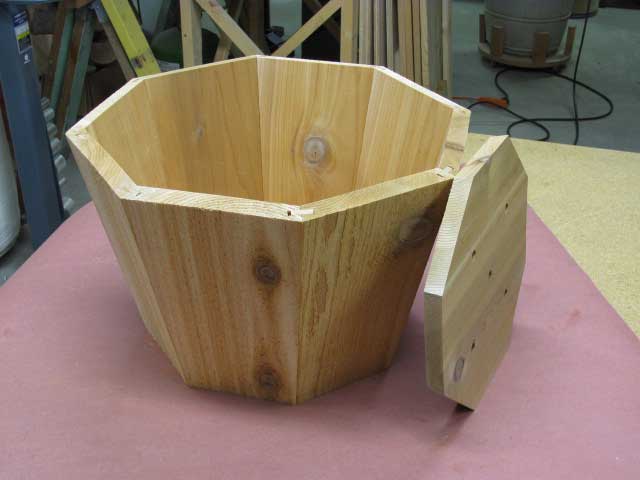
8 Side Tapered Flower Pot

Wood flower pots are very nice in appearance and each year they take on a new personality depending on their contents. I wanted an 8 sided Western Red Cedar pot about a foot tall with a 12 degree taper. Consulting compound miter tables readily available on the Internet, I determined that the correct settings were 4.56 degree miter and 22.06 degree bevel. Since I wanted to make a bunch of them, I made a couple of jigs, one with a 85.4 degree angle for the first cut (Jig1) and the other with a 99.2 degree angle for the second cut (Jig2). It is very important to use the jigs in proper order when making the parts.
These jigs allow me to cut the correct miter on both sides of each piece using a standard fence on the table saw. The other benefit is that each side can be made any length and any width, depending on what you have to work with. The first step is to rip to a uniform width, in my case about 7.5″ wide. Since I made 2 pots on this run, I cut 18 pieces 12″ in length using a stop (2 pieces were for setup and goof ups).
The table saw was set to a 22.1 degree bevel and, using the jigs, the fence was set to cut the taper so the bevel was continuous the entire length. After the first side was cut using Jig 1, I switched to Jig 2, reset the fence, and cut all the second sides.
I tried various methods of joining the sides and settled on a spline joint because it was both easy and strong. The trick is to cut the groove without touching the saw’s bevel adjustment. Simply replace the saw blade with a 1/4″ dado stack and adjust the fence to cut the groove on the edge leaving enough material on each side of the cut for strength. Here is where I burn a setup piece determining the position and depth of the dado blade. Since this is not a furniture grade project, I cut the groove deeper than the spline material to allow for ease of assembly and expansion. After a couple of months outdoors, everything warps, shrinks, cracks, etc. so why bother making it “perfect”? OK, so I cut the grooves using a push block to keep the side against the fence while applying pressure downwards to maintain depth. Since we didn’t change the saw bevel setting, the grooves will be at a perfect 90 degrees to the face of each side! Sweet huh?
Next, the splines are cut using a narrow rip jig exactly 10″ wide. If I want a 1/4″ wide spline, I set the fence at 10.25″ and safely cut the narrow pieces. It is necessary to have a zero clearance insert for this operation otherwise you risk the chance that the workpiece will be trapped between the blade and the hole in a standard insert resulting in smoke, ruined pieces and possible kickback. I use the same length for the splines as the sides on the uncut blank, so the splines are a tad short when inserted into the tapered dado but, like I said earlier, this isn’t fine furniture. Using waterproof glue, the splines are glued in place to produce 1/4 assemblies. How do you hold the pieces in position while the glue sets? Again, I made another jig by simply assembling a piece and glue a couple of boards to a piece of plywood with the same taper. We’re not trying to clamp the edges together, but rather hold the pieces together while the glue sets in the spline. Once the glue sets on the jig, simply slide the pieces in the taper and the jig holds the sides in position.
Brutal outdoor conditions will separate the joints anyway, so it’s not necessary to make each edge perfectly aligned so long as the spline has sufficient glue. The jig works great in achieving this objective. After the sides are joined 2 each, next join the 2 assemblies to make a new assembly with 4 sides. The 4 sides will lay on a flat surface when the glue dries without any additional fixturing. Finally, glue the two halves together and use a band clamp to draw them tight. Not much pressure is necessary because the glue joint in the splines is what gives the flower pot it’s strength and stability. Make sure the final glue up is done on a flat surface.
Almost done! The pot needs a bottom that will drain excess water. If necessary glue up stock to achieve a width about an inch wider than the opening in the bottom of the pot. Cut the bottom square an inch oversize. Next, set the saw blade to a 12 degree bevel and cut the square so the smallest part of the taper is about 1/2″ longer than the opening at the bottom of the pot. Layout and cut the corners of the square to make an octagon, again with a 12 degree bevel. Drill about 5 holes 1/2″ diameter in the bottom for water drainage and drop the octagon piece in the pot. It should self align and not drop through because of the tapered beveled edges. Once you’re happy with the fit, apply glue to the edges of the bottom, drop into place and add a few brads to keep everything in place. I stain the pots with a waterproof deck finish for appearance. Add some rocks, soil and flowers to bring the pot to life!