Making Cathedral Arch Templates for Cabinet Doors Using SketchUp


I’m just too cheap to purchase templates so I will share a method I used to make my own cathedral arch templates. My top rails are all 6″ in height which provides plenty of room for a nice visual on the arch. The tricky part was designing the templates for a consistent look for various width doors, so I used SketchUp Make, a free program from Trimble, to draw the arches and then obtain the necessary compass radii for the arcs. I use Freud router bits which cut a 13/32″ stub tenon.

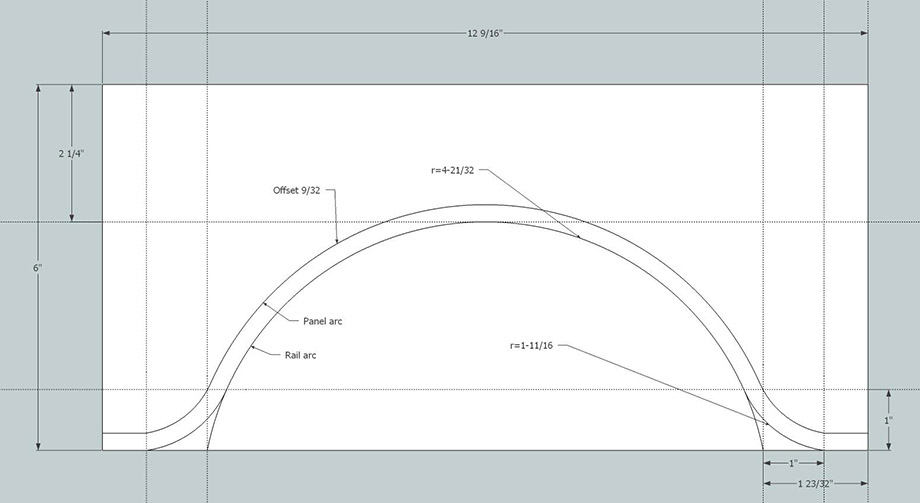
How to construct a cathedral door template using SketchUp
- Draw a rectangle 6” tall by the length of your top rail including the stub tenons, in the example above 12-9/16″.
- Draw a construction line parallel to the top the same distance as your stile width, typically 2.25”.
- Draw a construction line in from each edge the sum of the stub tenon plus 1-5/16”, in my case 1-23/32″.
- Draw construction lines parallel to the construction lines just drawn a distance of 1” back toward the edge.
- Draw a construction line parallel to the bottom by 1”.
- For the rail template, draw an arc using the intersections of the bottom and the construction lines drawn in step 3, with the arc extending to meet the construction line drawn in step 2. This is the large cathedral arc.
- Draw smaller arcs at the bottom using intersections of the bottom of the rail and the construction lines drawn in step 4 as the first point, with the intersection of the large arc and the construction lines drawn in step 5 as the second point extending to be tangent to the arc. Be careful as there are two possible tangent snaps, one to the bottom and one to the arc. You want the one to the arc.
- For the panel template, select the individual pieces of the cathedral arc and offset them upwards by the length of the stub tenon minus 1/8” for the panel expansion allowance.
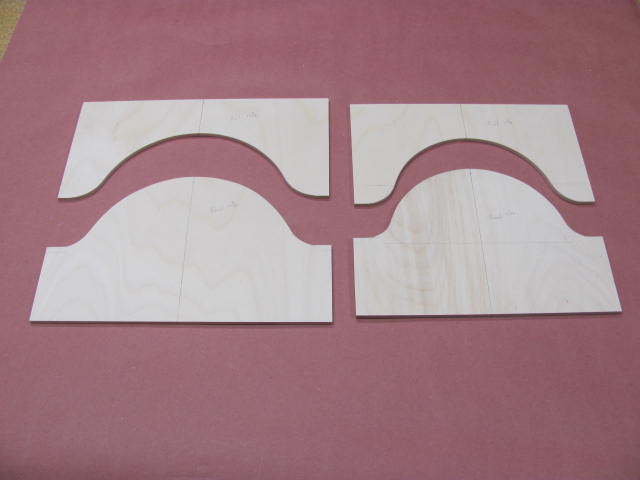
- Since my printer cannot print a template at full size, I obtain the arc radius information by looking at the “Entity Info” and selecting the arcs drawn in steps 6 and 7 and setting my drawing compass accordingly. To obtain the panel template, I use the rail template cutout and scribe a line with the same offset as step 8.
- When you cut the patterns from the template drawing, mark the rail length points on the bottom and mark the center point on the top and extend the overall width of the pattern about two inches to the left and right. The marks will help position the pattern on the rail or panel and the extra width will allow you to have a bearing surface to enter and exit the router cuts when pattern routing.
I hope my website visitors find this information to be useful. If you do, send me an e-mail with your comments.


